Foundry Furnace and Burner |
||
Work
|
This is the furnace I built according to Dave Gingery's book, Building A Gas Fired Crucible Furnace. The nice feature of this furnace is that you remove the crucible from the side so you don't have to be looking down into the furnace trying to pick the crucible up from the top. Below shows the furnace closed as it would be when in use. Next you can see the furnace open so that it is possible to reach in and take the crucible out. I use a #8 silicon carbide crucible, this will hold about 8 pounds of molten aluminum. The foot pedal that is visible in the lower, right front of the furnace is used to open the lid. When the furnace is closed you step on the pedal and the lid of the furnace, about 2" high, lifts and then you can swing it out of the way. This makes it easy to access the crucible in order to add more metal or degas the molten metal. 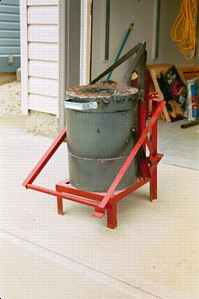 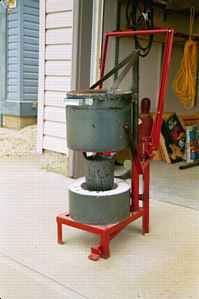 The only differences I made from Dave Gingery's book are that I used a different burner and I didn't use a castable refractory cement. Instead of using the castable refractory I decided to use Kaowool, a high temperature insulating ceramic wool. I thought this would be more efficient and allow the furnace to heat up quicker. It also makes the furnace lighter so it is easier to move and easier to open. The base of the furnace was made using a castable refractory to help the stability of the furnace. For the main body I made the sheet metal as per Gingery's book but out of heavier 18 ga. metal so it would have more rigidity since it wouldn't have the castable refractory to add rigidity. The Kaowool came in 1" thickness so I cut two pieces so that they would be a snug fit inside the body and give 2" wall thickness. The outside ring of the lid was made of the same sheet metal as the body. Then I welded a disc of expanded metal on the top. When I installed two layers of Kaowool I secured it to the lid by running loops of nichrome wire through the expanded metal and Kaowool. The expanded metal also provides a solid platform to place metal before it goes into the crucible. Once all the Kaowool was in place I painted it with waterglass (sodium silicate) to make the surface of the wool firm and to prevent erosion. A number of friends are using a burner that is a variation on the design from Ron Reil's website. The basic design was modified by Rupert Wenig to enlarge it, this works good enough that Rupert regularly melts cast iron in his furnace. Harvey Penno, another member of our group in Edmonton, came up with the idea of using a weld transition to provide a smoother flow of air in the burner. I made some further changes to the design. 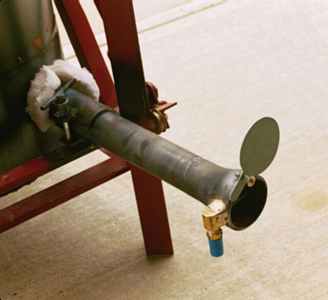 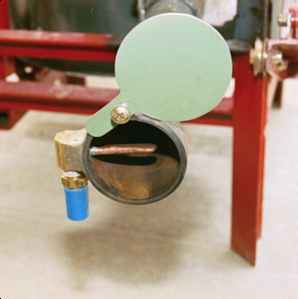 Above is the picture of the burner installed in my furnace. The white stuff where the burner enters the furnace is just some Kaowool I used to seal the burner entrance. I decided to use a fitting silver soldered onto the outside of the fitting with a stub of copper pipe soldered into that from the inside, versus the 1/8" pipe nipple used by Harvey. I thought this might improve airflow through the burner. With the gas inlet shaped this way and using a welded on transition rather than a regular fitting makes the inside of the burner quite smooth. The blue cap visible in figures 3 and 4 is just a plastic cap covering a propane quick disconnect fitting. The green plate is a disc that I can swivel over the opening to choke off some of the airflow. I use a 100 pound propane tank for the fuel supply with a high pressure adjustable propane regulator. I run the pressure at 20-22 psi and find that I can leave the choke wide open. There is a needle valve on the hose just before the quick connect. Other than keeping the needle valve open part way for the initial warm up I find that I'm running the burner with the needle valve fully open. I used a #50 drill for the propane jet. |
|
|
|