Casting Accessories |
||
Work
|
There are some extra bits you'll need to start casting. The items pictured and described here are what I use but are just shown to give you an idea of what is required, there are any number of variations that you could choose to use. 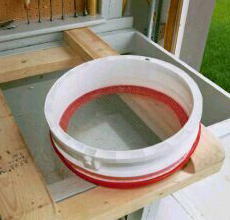 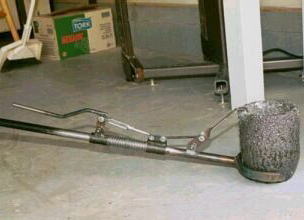 Above is a riddle I made using a 5 gallon plastic pail, as per Rupert Wenig's design. It is used to screen the sand that goes next to the pattern to ensure that there are no hard lumps of sand or foreign matter which may affect the quality of mold you get. To make the riddle cut a disc of hardware cloth, basically a large spaced screen, just slightly larger than the diameter of the pail you are going to use. Cut the centre out of the pail's lid and cut the side of the pail about 3" from the top. Place the ring cut from the pail on a solid surface, place the hardware cloth on top and then the ring that is left of the lid. Place a piece of wood on the lid ring and knock it into place with a hammer, the hardware cloth will be securely fastened in place. The next picture is the pouring shank I built. This is used to take the hot crucible, seen in the shank in this picture, full of metal out of the furnace and to pour the metal. I wanted one shank that would allow me to take the crucible out of the furnace and do the pour, without having to use separate lifting tongs and a pouring shank. I also didn't want to use a clamp style shank that would grip the crucible. I am very happy with the way the shank I built has worked for me. The ring is 3/8" X 1" CRS formed into two thirds of a circle. This allows me to go around the smaller diameter at the bottom of the crucible and when I lift the crucible sits firmly in the shank. The hand operated hook at the top is to ensure that the crucible can't fall out when pouring. The trickiest part of the construction was forming the ring as it is tapered out from the bottom to the top to fit the crucible as snugly as possible. I used my foundry furnace as a forge to heat the metal when I was making this ring. 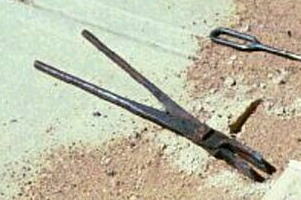  These are the blacksmith tongs I got from my grandfather. I find these are very good for adding metal to a melt in progress. Next is a skimmer and an ingot mold that I made. The skimmer is a stainless steel kitchen skimmer with a piece of tubing attached for a handle. In this picture it is copper tubing but it has since been switched to stainless steel tubing since that is a less efficient heat conductor so the handle doesn't get as hot. The skimmer is used to skim off the dross floating on top of the melt just before you pour. Depending on the cleanliness of what you are melting there will be more or less dross. The ingot mold is made from some scrap angle iron I had lying around. Construction is straight forward. To use it I spray it with dry graphite, I use an aerosol can from Canadian Tire which seems to work well and is very convenient. The graphite is used as a release agent so the ingots won't stick to the mold. Also remember that any metal that comes in contact with molten metal should be heated first to ensure that it is absolutely dry. The smallest amount of moisture could cause an explosion. I heat the ingot mold and the skimmer in the furnace exhaust before using them. 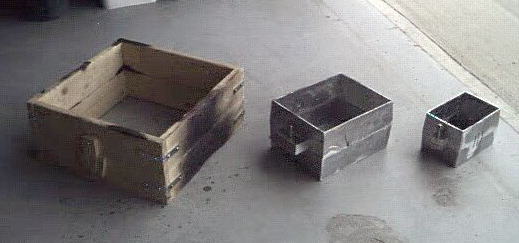 The flask on the left shows the first style of sand flask I built, this is what the sand mold is made in. I elected to build wooden flasks initially because of the ease of construction and cost. I put the metal reinforcing corners on the outside, as you can see in the picture, but on future flasks I would put it on the inside of the corners. This would allow it to sit better when you tip it up on its side. The locating pins that you can see on the side are to ensure that the flasks always go together in the exact same way. This is important so that when you separate the flasks to remove the pattern you can put it back together properly. You will eventually need several sizes of flasks which you will build over time, as required. I used patterns from Robert Grauman to cast two sizes of smaller flasks out of aluminum, these are the two sets of flasks on the right in the picture above. These should last longer than wood flasks as they won't burn. Since it is useful to have the locating pins in the flasks in the same location from flask to flask of the same size I made a jig for each size of cast flask and used that to drill the holes for the locating pins. If you make them all the same there are several advantages;
You don't want to use too large a flask since they are heavier, and thus harder to handle, and use a lot of sand. However too small a flask for a given pattern will not allow enough sand between the pattern and flask, you should try for at least 2" of clearance all around your pattern, including gates and sprues. 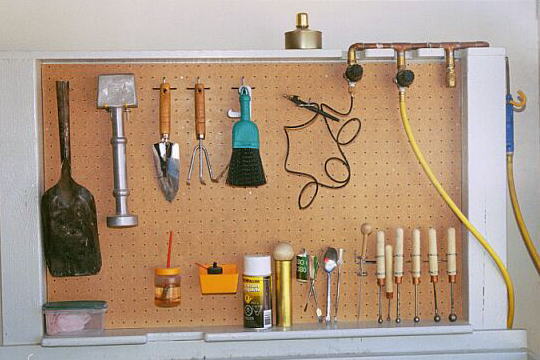 Above you can see all small extras that I keep on the pegboard on my molding bench. On the top shelf there is a small container where I keep an alcohol lamp. The other items, starting from the left the upper row are;
The lower items from left to right are;
|
|
|
|